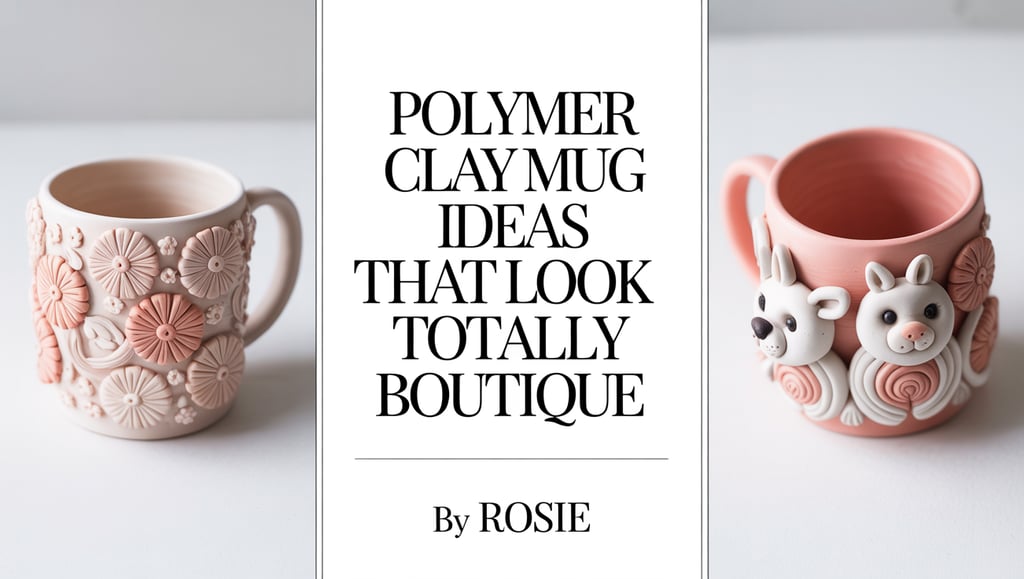
Polymer Clay Mug Ideas That Look Totally Boutique (and Make the Sweetest Gifts!) ☕💖
Transform Basic Mugs Into Bespoke Masterpieces! ☕✨ Discover stunning, easy polymer clay techniques that turn a simple mug into boutique-worthy art. From whimsical creature hugs to elegant marbled handles, get step-by-step ideas, pro tips, and shoppable lists to create gifts (or treat yourself!) that look expensive but cost almost nothing. Your most-loved mug is waiting to be made.
HOME & LIFESTYLE
Okay, grab your favorite drink and pull up a chair, because I have to tell you about the craft that completely changed my gifting game... 🤯
You know those moments when you find a mug that just gets you? The weight is perfect, the handle fits your hand like it was made for you, and it makes your morning routine feel special? For years, I'd hunt for those mugs in boutique shops, always dying a little inside at the $45 price tag. 🏷️
Then I discovered the secret: Polymer clay isn't just for kids' crafts anymore, babe. It's the gateway to creating those exact boutique-quality mugs with your own two hands, for a fraction of the cost. We're talking under $5 per custom masterpiece kind of magic. ✨
This isn't about perfection, it's about personality. It's about making something that feels like a hug every time someone uses it. Whether you're creating the perfect gift for your coffee-obsessed bestie or treating yourself to a little creative therapy, these 10 ideas are your ticket to becoming that friend who gives the most thoughtful, jaw-dropping presents. 🎁
Ready to get your hands a little dirty and create something absolutely stunning? Let's dive in, bestie. Your inner artist is about to throw a party. 🎨
(Quick note: This post contains affiliate links. If you make a purchase through my links, I may earn a small commission at no extra cost to you. It's how I keep the creative ideas flowing!)
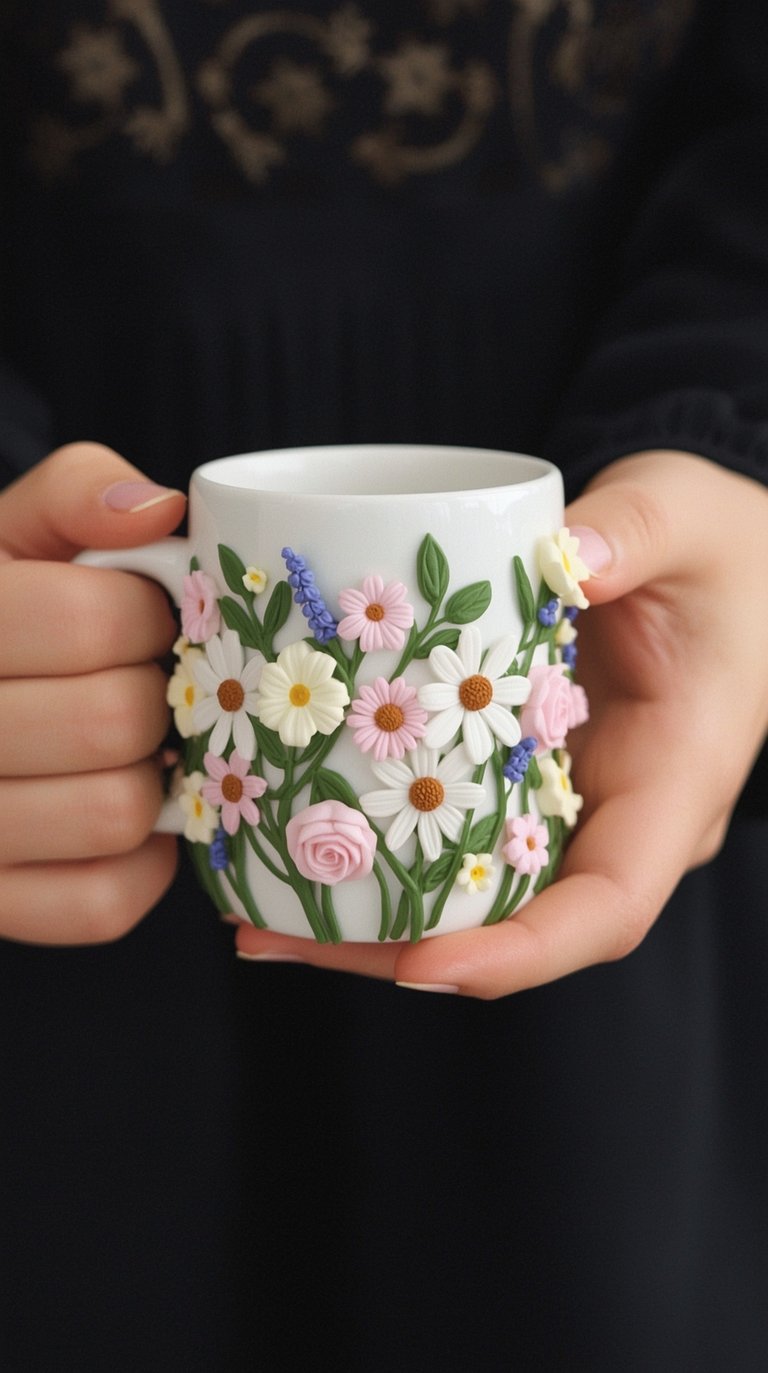
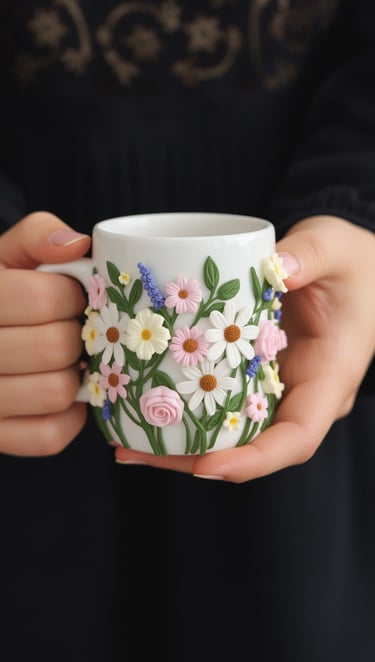
The "Blooming Gorgeous" Floral Polymer Clay Mug 🌸✨
The Vibe: Imagine holding a mug that feels like a miniature garden. We're talking delicate hand-sculpted daisies, romantic roses, or wild lavender vines climbing up the side. This isn't just a drink holder, it's a portable burst of spring that'll make even Monday mornings feel beautiful. ☕🌷
Here's the real talk, bestie: Creating these floral polymer clay mugs is WAY easier than it looks. The secret? Start simple. A few leaves and a couple of buds can be just as stunning as an elaborate bouquet. Use contrasting colors (think deep green leaves against pastel blossoms) and don't be afraid to mix flower types! Real gardens aren't perfect, and neither should your mug be.
My Can't-Mess-This-Up Tip: Condition your clay until it's super soft and pliable (like room-temperature taffy). Roll tiny balls for flower centers, flatten small circles for petals, and use a toothpick or clay tool to add subtle textures. Attach each piece with a tiny dab of liquid clay or by gently pressing, they'll fuse together beautifully in the oven.
Shop This Blooming Beautiful Look:
The Clay Starter Pack: Sculpey Premo Polymer Clay - Florist's Dream Colors - Perfect soft pinks, lavenders, and greens!
Tools for Perfect Petals: Polymer Clay Tool Set with Blades & Shapers - Get those delicate details right.
For Realistic Leaves: Silicone Leaf Veiner Mold - Makes professional-looking leaves in seconds.
The Classic Canvas: White Ceramic Mug Set - 4 Pack - Clean background makes your florals POP.
All-in-One Floral Solution: Floral Polymer Clay Mug Decoration Kit - Molds specifically designed for mug curves!


The "Modern Art Gallery" Geometric Accent Mug ⬢◼️✨
The Vibe: Clean lines, bold shapes, and a splash of metallic luxury. This mug looks like it belongs on the shelf of a minimalist interior designer who also happens to love a really good espresso. It’s sleek, it’s sophisticated, and it makes your desk look instantly more expensive. 🏢☕
Okay, real talk: You don't need a degree in geometry for this. The magic is in the contrast, matte black clay against a white mug with a single gold triangle? Chef's kiss. 🤌 The key is to work with rolled-out sheets of clay (use a pasta machine or rolling pin for consistent thickness) and cut your shapes with a sharp blade. We're going for precision, but a little handmade wobble just adds character!
My Pro-Tip for Crisp Lines: After you cut your shapes, chill the clay sheet on a baking sheet in the freezer for 5-10 minutes. Firm clay is way easier to lift and transfer without stretching or distorting those perfect edges. It’s a total game-changer.
Shop This Chic & Graphic Look:
Clay for Sharp Shapes: Fimo Professional Polymer Clay - Black & White - Holds sharp edges better when baking.
The Precision Cutter: Clay Razor Blade & Handle Set - For the cleanest cuts.
Metallic Magic: Gold & Copper Metal Leaf Sheets - Press into raw clay for instant luxe.
The Perfect Minimalist Base: Straight-Sided Porcelain Mugs - A smooth, flat surface is ideal.
For Perfect Rollouts: Acrylic Roller & Thickness Strips - Get that perfectly even clay sheet.
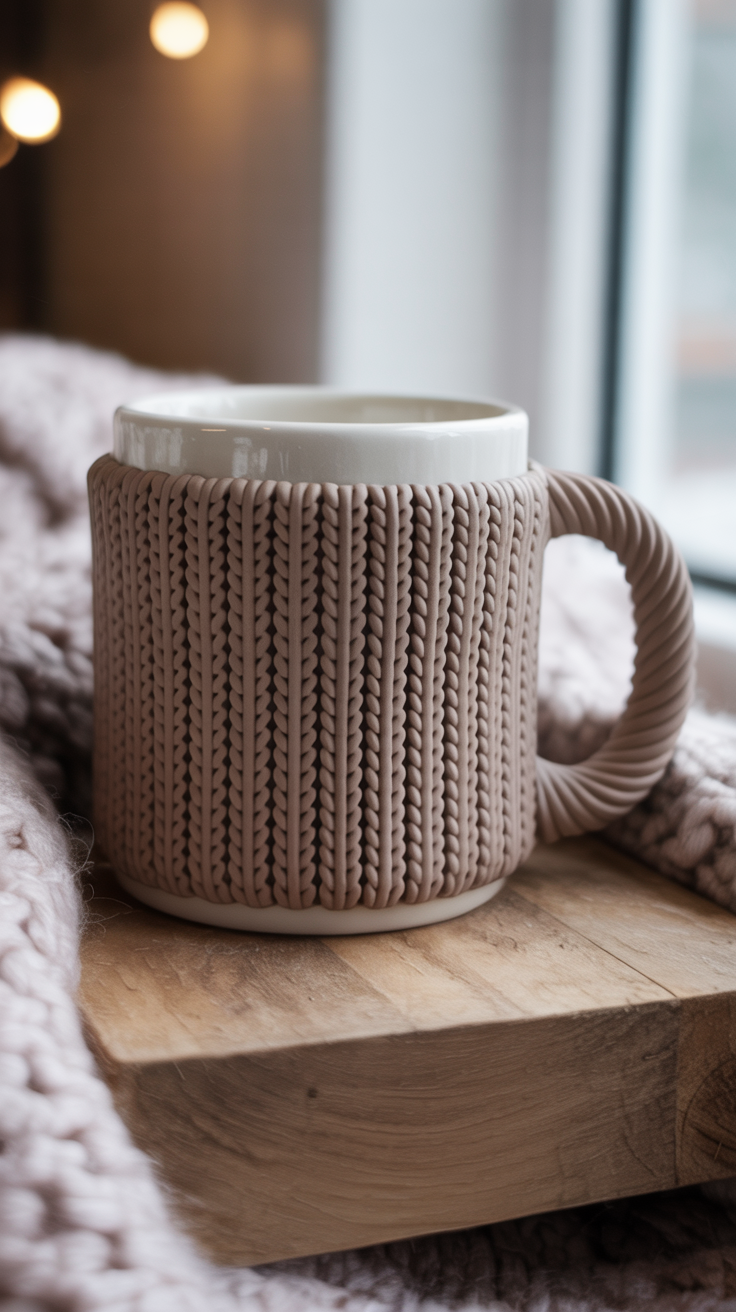
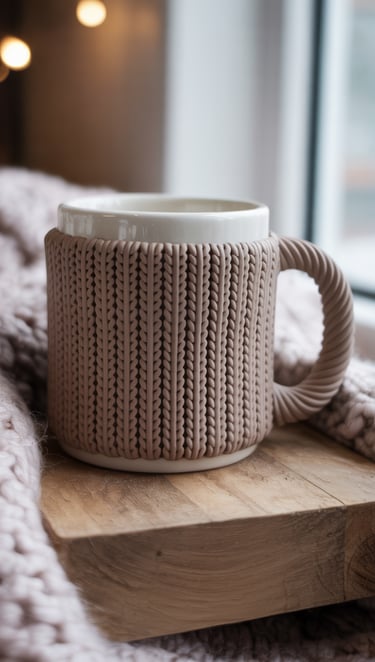
The "Cozy Café" Chunky Knit Textured Mug 🧶☕
The Vibe: This mug feels like a warm hug for your hands. It’s that perfect, comforting texture that makes you want to curl up with a good book and never let go. It looks like your favorite oversized sweater… but for your coffee. Ultimate hygge vibes! ❄️💖
Here’s the cozy secret: You don’t need to knit a thing! The texture comes from pressing real fabric right into the clay. Grab a scrap of a loosely knit sweater, some burlap, or even a textured dishcloth. Roll a sheet of clay, press the fabric firmly into it, peel it back, and boom—instant artisan texture that looks incredibly intricate and expensive.
My Snuggle-Worthy Pro-Tip: For the coziest, most authentic look, use a clay color in a soft cream, heather grey, or oatmeal. After baking, give it a very light sanding over the high points of the texture. This subtle distressing makes it look worn-in and loved, like a cherished heirloom.
Shop This Cozy Look:
Perfect Cozy Clay Colors: Sculpey III in Oatmeal, Ecru & Granite - The ultimate neutral, hygge palette.
For Defined Texture: Polymer Clay Texture Sheets - Knit & Weave - Consistent, beautiful patterns.
The Distressing Duo: Fine & Super Fine Grit Sanding Sponges - For that soft, worn feel.
The Cozy Base Mug: Classic Diner Mug with a Handle - The rounded shape feels great with this texture.
Strong & Invisible Bond: Sculpey Bake & Bond Liquid Clay - Adheres your textured wrap securely before baking.


The "Storybook Garden" 3D Decorated Mug 🍄🌈🌼
The Vibe: Pure, whimsical storytelling. This mug is a miniature diorama of happiness, with a cheerful rainbow arching over a tiny mushroom village and smiling flowers. It's nostalgic, textural, and looks like it jumped straight out of an illustrated children's book.
The Layered-Detail Secret: This look is all about building a cohesive scene with separate 3D elements. Work on a non-stick surface to create each piece individually: roll tiny clay coils for the rainbow, sculpt simple mushroom caps and stems, and form flower faces. Let them firm up slightly before carefully arranging and adhering them to your mug to prevent sagging.
My Whimsical Pro-Tip: Create a visual "anchor." Use the largest rainbow arc as your central focal point, then place the mushrooms and flowers "growing" from the mug's base up towards it. This creates balance and a sense of playful perspective. Use a dotting tool or toothpick to add tiny smiley faces and polka dots for maximum charm.
Shop This Whimsical Look:
Primary & Pastel Clays: Sculpey III 50-Piece Color Set - The ultimate palette for all your details.
Micro-Sculpting Tools: Precision Clay & Wax Carving Tools - For shaping tiny mushrooms and smiley faces.
The Perfect Canvas: Classic White Ceramic Coffee Mug - A clean backdrop for your scene.
Adhesive for Details: Sculpey Bake & Bond - Secures small pieces before baking.
Glossy, Food-Safe Finish: Varathane Water-Based Polyurethane Gloss - Protects and makes colors vibrant.

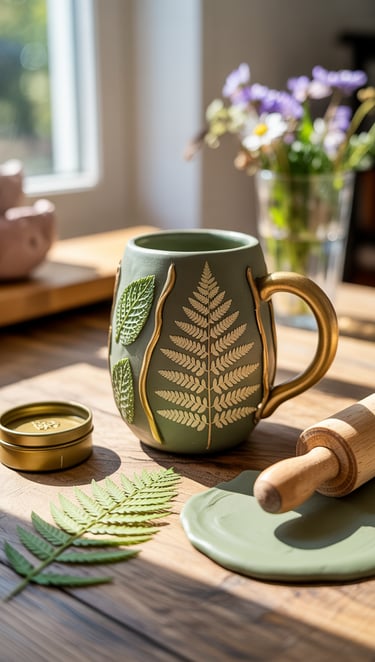
The "Secret Garden" Pressed Botanicals Mug 🌿🌼
The Vibe: Nature's elegance, preserved forever. This mug captures the delicate beauty of real ferns, flowers, or leaves with a touch of antique gold, making it look like a cherished treasure from a vintage botanical journal. Perfect for the plant lover or cottagecore enthusiast! 🍃✨
The magic is literally in your backyard: The most beautiful textures are free. Go foraging for small, flat leaves (ferns, mint, ivy), press them in a book for a day, then roll them into a clay slab. When you peel the leaf away, you're left with a perfect, intricate fossil. A light rub with gold wax in the veins? Absolutely divine.
My Nature-Lover Pro-Tip: For the clearest impression, use a firmer clay like Fimo Professional or Premo. Roll your clay out, let it sit for 5 minutes (a process called "letting it rest") to reduce stickiness, then press your leaf in firmly with a roller. This prevents smudging and gives you museum-quality detail.
Shop This Natural Elegance Look:
Clay for Fine Detail: Fimo Professional Polymer Clay - Earth Tones - Holds crisp impressions.
Antique Gilding Wax: Ruben's "Antique Gold" Metallique Wax - A tiny tube lasts forever!
The Perfect Base: Matte Stoneware Mug - The earthy texture complements botanicals.
Clear Protection: Polymer Clay Safe Gloss Varnish Spray - Seals and protects the surface.
For Clean Impressions: Small Acrylic Brayer Roller - Applies even pressure without sticking.
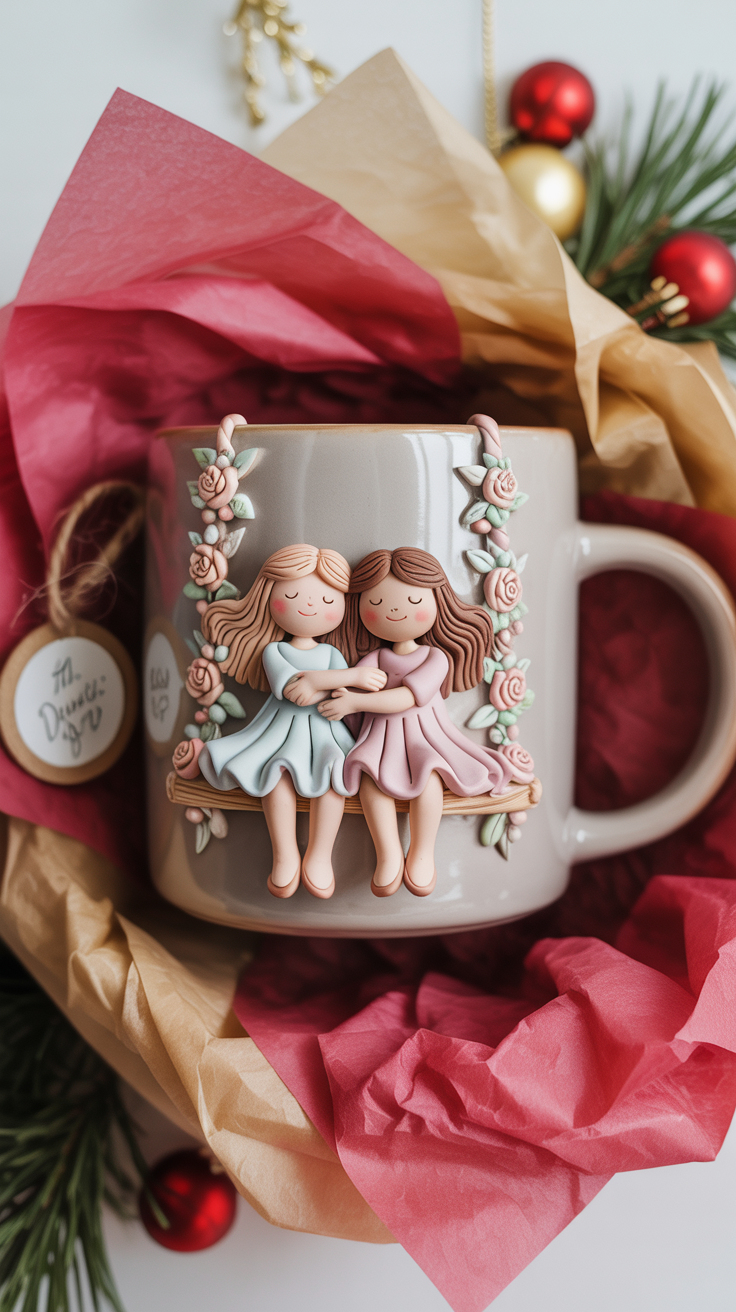
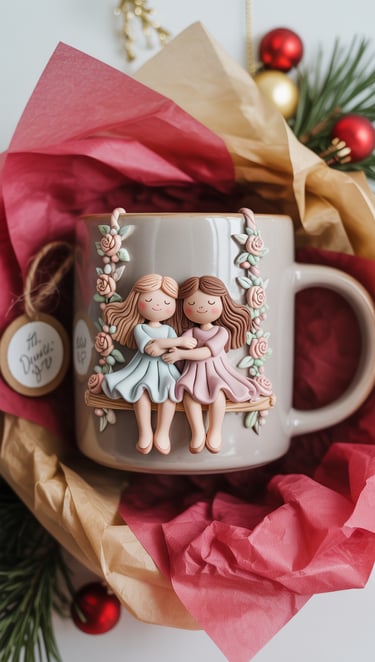
The Friendship Mug: A Floral Swing Sculpture 🧚♀️🌸
The Vibe: A tiny, magical diorama on the side of your cup. This isn't just a decoration—it's a whole sentimental scene of two friends on a floral swing, capturing a moment of pure whimsy and connection. It looks like a page from an illustrated storybook, inviting you into its little world with every sip. 📖✨
Let's build a miniature world: This project is advanced sculpting, but the magic is in building in layers. First, create and bake the 3D floral swing separately. Then, sculpt the two simple girls (think basic doll shapes with painted details) and attach them to the swing. Finally, adhere the entire assembled scene to your mug with industrial-strength glue. Patience is your best tool!
My "Tiny World" Pro-Tip: Use polymer clay in skin tones for the girls, but paint the final details (like faces and dress patterns) with high-quality acrylic paints after baking. This gives you far more control and crisp lines than trying to sculpt every tiny feature from clay.
Shop This Whimsical Look:
For Sculpting Figures: Super Sculpey Original Beige - The best clay for fine figure sculpting.
For Tiny Flowers: Silicone Miniature Flower Mold Set
Painting Precision: Arteza Acrylic Paint Set - For painting delicate faces and dresses.
Ultimate Bond: E6000 Craft Adhesive - For adhering the baked scene to the mug.
Matte Finish: Polymer Clay Safe Matte Varnish Spray - To seal the painted details and achieve a ceramic-like look.


The "Midnight Galaxy" Celestial Mug 🌙⭐
The Vibe: A cup full of stardust and dreams. This mug brings the magic of a clear night sky right to your coffee ritual, with shimmering constellations, glowing moons, and a deep, cosmic color palette that makes every sip feel mysterious and special. 🔭☕
Let’s talk constellations, bestie: This is where you get to play with mixed media magic. Start with a base of deep blue or black clay pressed onto the mug. Then, add your moons and planets. But here's the secret sauce: embed tiny glass seed beads or fine glitter into the raw clay for stars that actually catch the light. It creates a stunning, dimensional galaxy effect that photos can't even capture properly!
My Stargazer Pro-Tip: Use a needle tool or toothpick to create tiny dots in the clay "sky" and fill them with a drop of liquid clay mixed with fine glitter. When baked, they look like distant, twinkling stars. For a glowing planet, mix a pinch of that glitter into a small ball of translucent clay before shaping it.
Shop This Cosmic Look:
Deep Space Clay: Sculpey Premo in Black, Cobalt & Transparent
For Twinkling Stars: Assorted Size Silver & Gold Glass Seed Beads
Celestial Shapes: Moon & Star Shaped Cookie Cutters
The Dark Canvas: Black Ceramic Coffee Mug
The Star-Maker: Extra-Fine Holographic Glitter


The "Gilt-Edge Monogram" 3D Initial Mug 🔤✨💖
The Vibe: A statement piece of personalized luxury. This isn't a flat decal—it's a bold, dimensional initial that you can actually feel, finished with metallic accents that make it look like custom jewelry for your mug. It's confident, custom, and looks wildly expensive.
The Raised-Letter Secret: The pro look comes from building height and texture. Don't just cut a letter from a flat sheet. Roll thick clay ropes to form the letter's lines, stack them, and press them onto the mug to create a substantial 3D form. Before baking, press texture sheets (like linen or hammered metal) onto the surface for incredible depth.
My Metallic Edge Pro-Tip: For the luxe finish, don't paint the whole letter. After baking, use a small, dry brush to lightly swipe metallic wax (like Rub 'n Buff) over just the highest textures and edges of the initial. This "dry-brush" technique catches the light and makes the letter look forged from metal.
Shop This Luxe Custom Look:
Clay for Structure: Sculpey Premo Polymer Clay - Holds sharp, raised edges.
For Texture: Polymer Clay Texture Sheets - Create a linen, wood grain, or geometric pattern on your letter.
Metallic Magic: Ruben's "Gold Leaf" & "Silver Leaf" Metallique Wax - A tiny tube is all you need.
Decorative Add-ons: Miniature Clay Cutter Set (Hearts, Stars) - For the customizable accents.
The Ultimate Bond: Sculpey Bake & Bond Liquid Clay - Ensures your hefty initial stays put during baking.


The "Jewel-Toned" Stained Glass Illusion Mug 🎨🌈
The Vibe: A brilliant burst of color that glows when held up to the light! This technique creates the stunning illusion of leaded stained glass, making your mug look like a miniature Tiffany lamp or a church window. It's cheerful, artistic, and guaranteed to spark conversation. ☀️✨
Let's create some light magic: This is all about translucent clay and negative space. You'll create a "frame" or "lead lines" with opaque black or grey clay on your mug, leaving open "window" spaces. Then, you'll fill those spaces with beautifully colored translucent clay. When it bakes and you hold it to the light? Pure magic. The translucent clay lets the light shine through in gorgeous hues.
My "Light Catcher" Pro-Tip: For the most vibrant color, mix a tiny pinch of opaque colored clay into your translucent clay. For example, a bit of opaque red mixed into translucent clay gives you a rich, ruby-red "glass." This gives you more control over the intensity than using pre-colored translucent clay alone.
Shop This Luminous Look:
The Color Foundation: Kato Translucent Polyclay - The clearest, strongest translucent clay.
For Opaque "Lead Lines": Fimo Professional in Black & Dark Grey
To Tint the "Glass": Sculpey III Accent Colors - Small packs are perfect for tinting.
The Best Canvas: Clear Glass Coffee Mug with Handle - Maximizes the light effect!
Liquid Bond: Kato Liquid Polyclay - Essential for adhering clay to glass.


The "Love Language" Valentine's Heart & Flower Mug 💘🌹🥰
The Vibe: The ultimate gesture of love, baked right onto a mug. This design is pure romance—whether it’s for your partner, your Galentine, or a sweet gift to yourself. Think cascading hearts, a single perfect rose, or delicate floral vines in shades of blush, crimson, and cream. It’s a hug in mug form. 💌☕
Let’s create some heartfelt magic: This is where simple shapes tell the biggest love story. You don’t need to be a master artist. A heart is just two teardrops pressed together. A rose is a simple coil of clay, rolled from the center out. The secret is in the color gradient and arrangement. Blend a bit of white into your red clay for a soft pink ombre heart. Arrange small hearts in a winding path around the mug for a "following my heart" vibe.
My "Made-With-Love" Pro-Tip: For a truly decadent, luxury look, combine hearts with gold. Create your clay hearts, and before baking, gently press gold leaf flakes or use a metallic wax just on the edges. This tiny detail makes it look like a precious, gilded heirloom. It says "I went the extra mile for you."
Shop This Romantic Look:
The Romance Clay Palette: Sculpey Premo in Blush, True Red, & Pearl
For Perfect Hearts: Mini Heart-Shaped Clay Cutters
Luxe Gilding Touch: Artisan Gold Leaf Flakes
The Classic Gift Base: Elegant Porcelain Mug with a Box
Easy Rose Mold (Optional): Silicone Rose Flower Mold for Clay


The "Nightingale's Brew" Personalized Nurse Polymer Clay Mug ⚕️💖
The Vibe: A heartfelt, custom tribute for the guardian angel in scrubs. This mug isn't just a gift—it's a tangible "thank you" for the long shifts, the gentle hands, and the unwavering heart. Perfect for a nursing graduate, a seasoned RN, or a healthcare hero who deserves their coffee served with a side of deep appreciation. 🏥✨
Let's craft a dose of gratitude: This design blends professional symbolism with personal touch. Think beyond a basic red cross. Create a delicate polymer clay stethoscope that curves gracefully around the handle, a tiny, detailed nurse's cap, or a heart with a subtle medical caduceus inside. The personalization comes from adding their name, graduation year, or a special date in elegant clay letters next to the emblem.
My "Heartbeat" Pro-Tip: For an incredibly personal touch, create a miniature "charm" that represents their specialty. A tiny baby footprint for a NICU nurse, a clay heart for cardiology, or a little brain for neurology. Attach this charm beside the main design. It shows you truly listened and honors their specific path.
Shop This Heartfelt Gift:
Professional & Soft Colors: Sculpey Premo in Cadet Blue, White, & Burgundy
For Tiny Details & Lettering: X-Acto Precision Knife & Alphabet Stamps
The Perfect Backdrop: High-Quality, Large-Volume Ceramic Mug (They need a big cup!)
For a Luxe Finish: Polymer Clay Gloss Glaze - For a smooth, easy-to-clean finish.
Strong, Safe Bond: GE Silicone II Kitchen & Bath Sealant - Food-safe and heat-resistant once cured.
Personalized Nurse Mug, Handmade Clay Design, Graduation Gift-
final thoughts
You've got this, bestie! Remember: perfection is boring, but personality is priceless. Your slightly wobbly lines and unique color combos are what make your mugs special—and utterly giftable. ✨
Quick Tips:
Safety first: Use clay-dedicated tools & ventilate when baking.
Wash with care: Hand-wash only to keep your creations vibrant.
Start simple: Pick one idea and just PLAY. You'll amaze yourself.
Now go create something beautiful, you absolutely deserve to drink from art you made yourself.
Happy creating! 💖